Okay so there is already a write up for this, but most of the pictures are gone for it. So I will do one and include my own pictures.
Quad Beam Headlights W/ or W/O Fog Lights (Diode Edition)
This article will walk you through the steps to install a diode (Quad w/o fog lights) or 2 diodes (Quad w/ Fog Lights). This mod will retain all factory functions except when switching to high beams, your lows or lows and fogs will stay on. As opposed to the lows and fogs shutting off when switching to highs.
This mod is highly recommended if using Hid bulbs in your low beams, as they will not shut off when going to highs, so you will not have a "warm-up" period when going back to lows.
Time Required:
15-20 minutes from start to finish
Cost:
Free to less than $5 depending on where you find the diodes,wire and heat shrink tubing
Parts Required:
3 amp diode - 1 or 2 depending on if you want fog lights on also
Random lengths of wire (I used 6" strips of red and black)
Tools Required:
Soldering Iron
Solder
Wire Cutters/Strippers
Heat Shrink Tubing
Lighter, or other heat source to shrink tubing
Lets Gather Up Our Supplies

Step One:
For quads w/o fogs, you will use 1 diode.
For quads w/fogs you will use 2 diodes. Twist the 2 ends of the diodes that have the silver stripe on them together.

Step Two:
For quads w/o fogs:
Solder one length of wire to the silver stripe end of diode (I used red wire), Then solder another length of wire to the other end of the diode (I used black). When done it should look like this:

For quads w/fogs:
Solder one length of wire to the twisted end of the diodes (I used red wire), Then solder another length of wire to the other end of each diodes (I used black wire). When done it should look like this:

Step Three:
For quads w/o fogs:
I used 2 different sizes of heat shrink tubing, first was on the wires up to the diodes, then the other was to go over the diode. When done should look similar to this:

For quads w/fogs:
I did basically the same thing as w/o fogs, but i also used another size of heat shrink to go over the 2 diodes together, just makes it look cleaner IMO. Once done, should look similar to this:

Just a Picture of both quads w/o and w/fogs soldered up and heat shrinked:

Step Four:
Time for Installation!
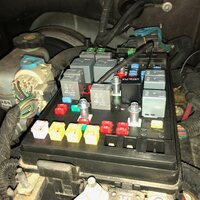
Will be installed at the front fuse box (Underhood).
For either setup, you will want to strip the ends of the wires, as we will be wrapping the ends of the wires around the relay pins.
For quads w/o fogs:
Remove relays #43, and #46.
Wrap the wire on the end of the diode with the stripe on it (red wire in my diagrams and pictures) around pin #85 on the high beam relay (#43).
Wrap the wire on the other end of the diode (black wire in my diagrams and pictures) around pin #5 on the low beam relay (#46)
Install relays as shown in diagram below:

Installed picture of diode:

For Quads w/fogs:
Remove relays #39, #43, & #46.
Wrap the end of the diodes with the stripe on it (red wire in my diagrams and pictures) around pin #85 of the high beam relay (#43)
Wrap one of the wires on the other ends of the diodes (black wires in my diagrams and pictures) around pin #5 of the low beam relay (#46), and the other wire around pin #85 of the fog light relay (#39)
Install relays as shown in diagram below:

Installed picture of diodes:

Step five:
Turn on your headlights, then switch to high beams and make sure that your low beam or low beam and fog lights are on with high beams.
Step Six:
Enjoy your new quad headlights, either w/ or w/o fog lights!

Also Avaliable for sale!!
For those of you who don't feel comfortable soldering, or just don't feel like soldering. I am selling some pre-soldered kits, that are available in the market place HERE
Quad Beam Headlights W/ or W/O Fog Lights (Diode Edition)
This article will walk you through the steps to install a diode (Quad w/o fog lights) or 2 diodes (Quad w/ Fog Lights). This mod will retain all factory functions except when switching to high beams, your lows or lows and fogs will stay on. As opposed to the lows and fogs shutting off when switching to highs.
This mod is highly recommended if using Hid bulbs in your low beams, as they will not shut off when going to highs, so you will not have a "warm-up" period when going back to lows.
Time Required:
15-20 minutes from start to finish
Cost:
Free to less than $5 depending on where you find the diodes,wire and heat shrink tubing
Parts Required:
3 amp diode - 1 or 2 depending on if you want fog lights on also
Random lengths of wire (I used 6" strips of red and black)
Tools Required:
Soldering Iron
Solder
Wire Cutters/Strippers
Heat Shrink Tubing
Lighter, or other heat source to shrink tubing
Lets Gather Up Our Supplies
Step One:
For quads w/o fogs, you will use 1 diode.
For quads w/fogs you will use 2 diodes. Twist the 2 ends of the diodes that have the silver stripe on them together.
Step Two:
For quads w/o fogs:
Solder one length of wire to the silver stripe end of diode (I used red wire), Then solder another length of wire to the other end of the diode (I used black). When done it should look like this:
For quads w/fogs:
Solder one length of wire to the twisted end of the diodes (I used red wire), Then solder another length of wire to the other end of each diodes (I used black wire). When done it should look like this:
Step Three:
For quads w/o fogs:
I used 2 different sizes of heat shrink tubing, first was on the wires up to the diodes, then the other was to go over the diode. When done should look similar to this:
For quads w/fogs:
I did basically the same thing as w/o fogs, but i also used another size of heat shrink to go over the 2 diodes together, just makes it look cleaner IMO. Once done, should look similar to this:
Just a Picture of both quads w/o and w/fogs soldered up and heat shrinked:
Step Four:
Time for Installation!
Will be installed at the front fuse box (Underhood).
For either setup, you will want to strip the ends of the wires, as we will be wrapping the ends of the wires around the relay pins.
For quads w/o fogs:
Remove relays #43, and #46.
Wrap the wire on the end of the diode with the stripe on it (red wire in my diagrams and pictures) around pin #85 on the high beam relay (#43).
Wrap the wire on the other end of the diode (black wire in my diagrams and pictures) around pin #5 on the low beam relay (#46)
Install relays as shown in diagram below:
Installed picture of diode:
For Quads w/fogs:
Remove relays #39, #43, & #46.
Wrap the end of the diodes with the stripe on it (red wire in my diagrams and pictures) around pin #85 of the high beam relay (#43)
Wrap one of the wires on the other ends of the diodes (black wires in my diagrams and pictures) around pin #5 of the low beam relay (#46), and the other wire around pin #85 of the fog light relay (#39)
Install relays as shown in diagram below:
Installed picture of diodes:
Step five:
Turn on your headlights, then switch to high beams and make sure that your low beam or low beam and fog lights are on with high beams.
Step Six:
Enjoy your new quad headlights, either w/ or w/o fog lights!
Also Avaliable for sale!!
For those of you who don't feel comfortable soldering, or just don't feel like soldering. I am selling some pre-soldered kits, that are available in the market place HERE
Last edited: